![Navix Logo - Purple-1.png]](https://hs.navix.io/hs-fs/hubfs/Navix%20Logo%20-%20Purple-1.png?height=50&name=Navix%20Logo%20-%20Purple-1.png)
🚀 Key Benefits
- Eliminate up to 9 manual audit steps per load
- Bill your customer faster — customer billing can be released as soon as the order/POD is approved, without waiting on carrier invoice reconciliation
- Speed up exception handling and dispute resolution
- Unlock meaningful analytics without lifting a finger
🎥 Watch It in Action: Revenova + Navix Integration Demo
See how the integration works from end to end—without touching a spreadsheet.
.gif?width=670&height=377&name=Navix%20TechClips%20-%20Revenova%20Integration%20(1).gif)
*click the gif above to open the video in a new window
In this video:
- A load is booked in Revenova
- Navix pulls in and auto-creates the order
- Audit is completed and approved in Navix
- Finalized rates and documents sync back into Revenova
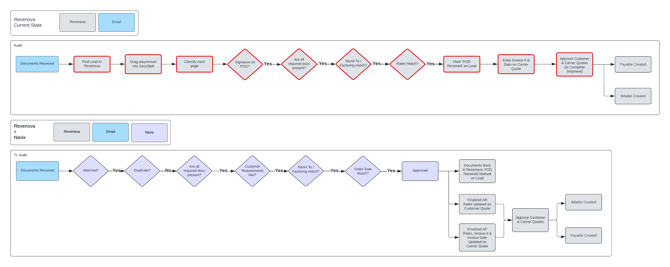
🆚 Workflow Comparison
Below is a visual of the typical steps taken to perform an audit with no exceptions in Revenova without Navix and with Navix. Every red outline indicates a manual step. Our customers typically see between 50-90% of their invoices flow through with no exceptions depending on mode split (LTL, TL, Dray, etc.):
🧩 What the Integration Includes
|
Functionality |
Supported |
|
Loads imported from Revenova |
✅ |
|
Audit results sent back to Revenova |
✅ |
|
Documents sent back to Revenova |
✅ |
|
AP/AR Quote Approvals |
✅ |
|
PreBill/Customer Billing on order approval |
✅ |
|
Multi-Carrier & Freight Plan auditing available |
✅ |
|
Rate Engine Connection |
❌ |
|
Disputes Integration |
❌ |
🔄 How Load Import Works
Navix pulls loads from Revenova automatically on a repeating schedule (the polling interval is configurable, and the poller also runs once at startup). A few details that matter for customers and Support:
- Only active loads are imported. Navix polls loads whose status is Assigned, In Transit, Dispatched, Delivered, or Completed. Draft/quoted loads are ignored until they reach one of these statuses.
- Incremental "changed since last run" import. Navix tracks the last successful poll time per customer and only pulls loads modified since then.
- Rich data capture. On import Navix reads BOL / Master BOL, Container & Trailer numbers, Order / PO / PRO numbers, equipment type, mode, service level, stops (pickup/dropoff addresses and dates), line items (NMFC class/number, weight, dimensions, handling units), carrier identifiers (**SCAC, MC#, USDOT#**), remit-to address, and carrier/customer payment terms — plus accessorials for both the customer and carrier quotes.
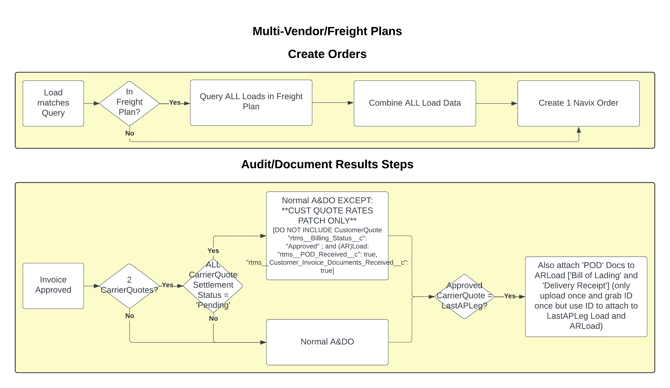
- Freight Plan correlation. When an imported load belongs to a Freight Plan, Navix pulls in all sibling loads on that plan so the whole plan is imported together.
⚙️ Setup Overview
You’ll need to complete the following in both Sandbox and Production:
- Create an API-only user
- Create a connected app
- Configuration
🔐 Step 1: Create an API-Only User
Note: Revenova subscriptions include 5 API-Only user licenses but a TMS Package license must also be available. If all are in use, you may skip this step and assign an existing API user during the next step.
- Go to Setup > Users > New User
- Use a Navix email: navix+yourcompany@navix.io
- Assign these settings:
- License: Integration Only / Salesforce Integration
- Profile: Salesforce API Only System Integrations (ONLY if unavailable, choose Minimum Access – API Only Integrations)
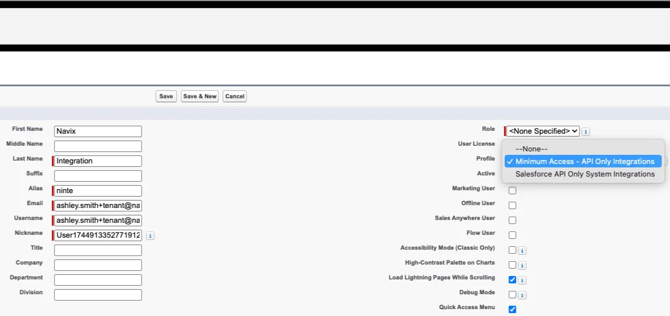
- Assign a TMS Package license
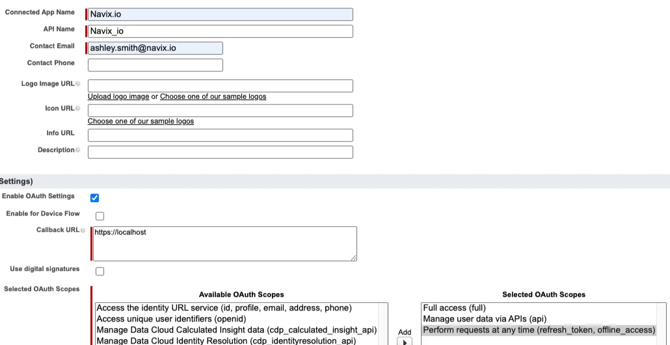
🔒 Step 2: Create a Connected App
- Navigate to App Manager → New Connected App → Create a Connected App
- Complete the form:
- Connected App Name: Navix.io
- API Name: Navix_io
- Contact Email: support@navix.io
- Enable OAth Setting: TRUE
- Callback URL: https://localhost
- OAuth Scopes:
- Full access (full)
- Manage user data via APIs (api)
- Perform requests at any time (refresh_token, offline_access)
- Mark these boxes:
- Require Proof Key for...
- Require Secret for Web Server Flow
- Require Secret for Refresh Token Flow
- Enable Client Credentials Flow
- Select Okay in the pop up

- After saving, return to App Manager, locate the Navix app, and:
- Click the dropdown arrow in the far right to select Manage → Edit Policies
- Set “Run As” to the Navix API user you created
- After saving, return to App Manager, click the dropdown to View → Manage Consumer Details to retrieve:
- Consumer Key
- Consumer Secret
- 📤 Send these securely to your Navix onboarding contact.
🧩 Step 3: Configuration
Work with your Navix contact to provide any custom fields your team uses in Revenova. Common fields include:
- Mode Name
- Equipment Type
- Accessorials (charge codes)
- Custom Reference Fields
- ‘Invoice Ready’ Checkboxes: Carrier Bill Received, POD Received, etc.
- If you use Freight Plans in Revenova, please notify Navix during setup so we can enable:
- A feature flag for multi- vendor Orders
- Custom matching first by Navix Order Number, then Navix Shipment Number
📌 Here is a link to our Revenova Custom Field Form to get started.
🧪 Testing (UAT)
Navix will perform validations in Sandbox first, then Production. Not required, but highly recommended, you may grant a viewer-only license for Navix during testing, if available, to speed the UAT process.
❓ Frequently Asked Questions
Does Navix create invoices in Revenova? Navix does not generate invoice documents; it updates billing and settlement statuses on the existing Customer Quote, Carrier Quote, and Carrier Invoice records (and AcctSeed records where applicable), and attaches supporting documents. Your existing Revenova billing process then proceeds from an Approved state.
Can we bill the customer before the carrier invoice is audited?Yes — that's what Pre-Bill does. Customer billing can be released on order/POD approval, independent of carrier invoice reconciliation.
What happens if a status update fails in Revenova?The error is written back to the Load as an Accounting Note so your AP/AR team can resolve it in Revenova, and the integration automatically retries transient failures.
Do we have to turn all of this on?No. Billing, Pre-Bill, AcctSeed, and PNG conversion are all configurable per customer. You can start audit-only and enable billing/settlement when you're ready.
Are disputes and rate-engine connections supported? Disputes are typically handled via email for our Revenova tenants and there is no rating endpoint available from Revenova currently.
🛠 Troubleshooting
Common reasons a specific load may not update as expected — and what they mean:
- "You cannot edit a completed load." The load was already marked Completed in Revenova, so Navix can't write to it. This is treated as a permanent condition and is not retried — expected behavior, not a failure to investigate.
- "This load is ON HOLD and cannot be booked." The load is on hold in Revenova. Navix will not force the update; clear the hold if the update is needed. Also non-retryable by design.
- Load never imported. Check that the load has reached an active status (Assigned, In Transit, Dispatched, Delivered, or Completed) and that its carrier meets the tender-status rules configured for the customer.
- Billing/settlement update didn't apply. Look for a note in the load's Accounting Notes field — Navix writes the specific error there for AP/AR visibility, and retries transient failures automatically.
- "Invalid Freight Plan." A multi-load order contained a load not flagged as part of the freight plan — a data-integrity guard. Confirm the freight plan setup in Revenova.
- Salesforce API limits. Navix uses Salesforce API v63.0 with rate-limit-aware retries and monitors the org's remaining API call budget, so normal operation shouldn't exhaust limits.
📞 Need Help?
Contact your onboarding manager or email support@navix.io.
🧠 Additional Resources
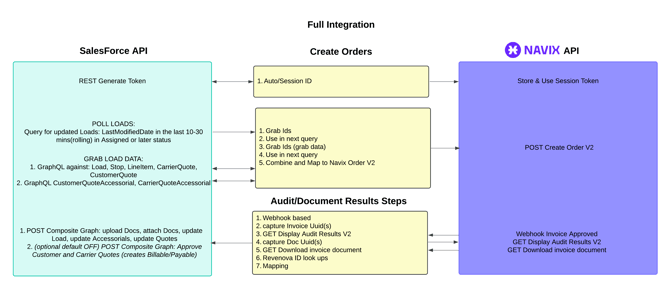
🗺 Integration Architecture
📋 Field Mapping Chart
This link is a csv for Revenova Field Mapping to Navix. The link includes the following tabs:
- Field Mapping Overview
- Freight Plan Mapping
- Field Mapping Detail