![Navix Logo - Purple-1.png]](https://hs.navix.io/hs-fs/hubfs/Navix%20Logo%20-%20Purple-1.png?height=50&name=Navix%20Logo%20-%20Purple-1.png)
STEP 1: Access the Queue
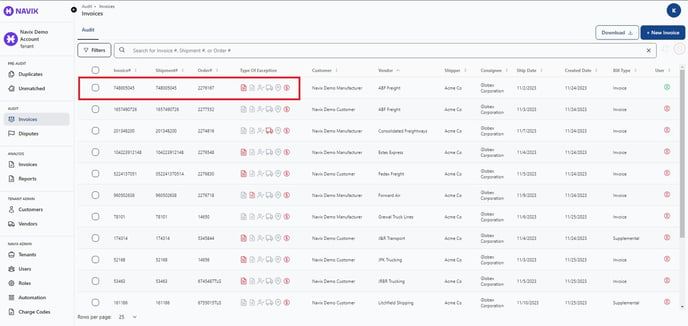
| How to locate the Invoices - Audit queue
Access these records by selecting the “Invoices” queue under the “Audit” section in the lefthand menu.
This will take you to a dashboard view of all invoices that have been matched to orders and are awaiting action.
In this queue, you will see 2 tabs; “Audit” and “Ready to Approve.”

STEP 2: Ready to Approve
| The Ready to Approve tab
The invoice records under this tab do not have any exceptions, or flags, that need to be reviewed before approval. Therefore, they are “Ready to be Approved.”
You can select ALL of the invoices and “Mass Approve” them to complete the audit process.

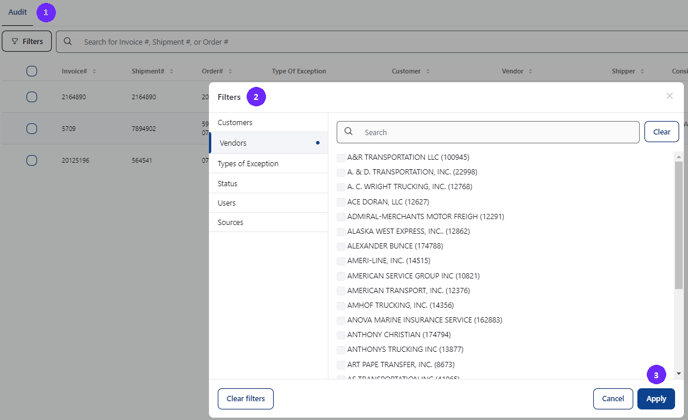
STEP 3: Narrow your focus
| How to filter the Audit tab
- Click on the “Filters” button in the upper left, to the left of the Search bar.
- A window will pop-up with various filtering options.
- The invoice list can be filtered by Customers, Vendors, Exception Types, Status, User, or Sources.
- Once selections have been made, click “Apply” to view the results.
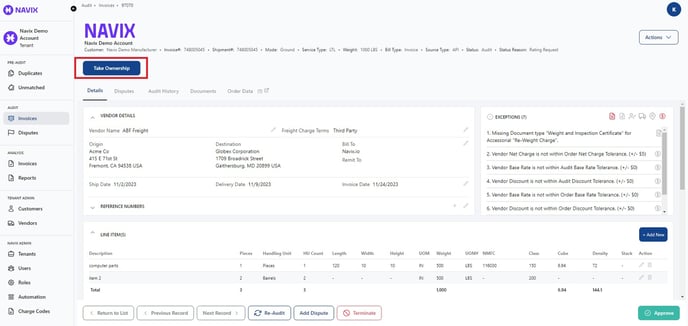
STEP 4: Open an Invoice
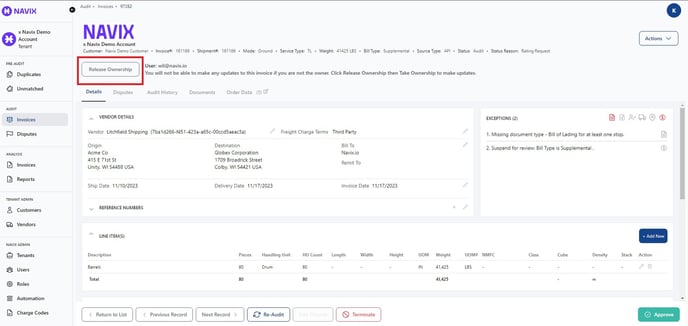
STEP 5: Ownership
STEP 6: Auditing "Other Details"
Once an invoice record is opened you’ll see the below Order Details, Invoice Details and “Other Details”
-png.png?width=688&height=133&name=Untitled%20(2)-png.png)
- If any of the following fields need to be updated, click on the “Actions” drop down in the top right hand corner of the invoice and choose “Edit Other Details” from the dropdown list.
- Invoice number (add or correct)
- Mode (Air, Ground, Non Freight, Ocean, Rail)
- Bill Type (Balance Due, Invoice, or Supplemental)
- Service Type (LTL, FTL, Parcel, etc…)
- Service Level
-png.png?width=191&height=250&name=Untitled%20(3)-png.png)
- Make the necessary updates to the information in the popup window
-png.png?width=686&height=307&name=Untitled%20(4)-png.png)
- Click “Save” to save all updates.
STEP 7: Review & Clear the Exceptions
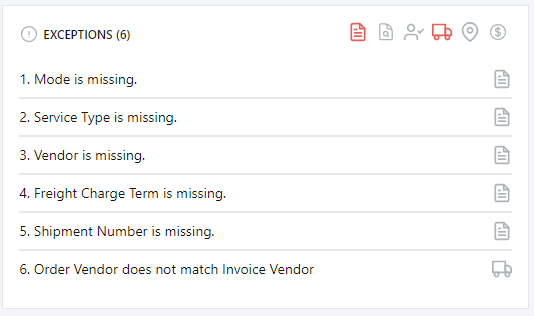
| How to locate, identify and resolve invoice exceptions
- In each line item of the Audit tab.
- Within each individual invoice.
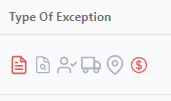
-png.png?width=688&height=180&name=Untitled%20(5)-png.png)
- Import - Exceptions tied to the Invoice, and/or validation of information pulled from it during the Navix Document Classification / Ingestion Process.
- Unmatched - Exceptions tied to the Invoice, when unmatched, from the corresponding Order.
- Customer - Exceptions tied to Customer field within Navix and/or Customer-specific Business Rules.
- Vendor - Exceptions tied to Vendor field within Navix and/or Vendor-specific Business Rules.
- Address - Exceptions tied to Addresses field(s) within Navix and/or Location-specific Business Rules.
- Rate / Audit - Exceptions tied to unknown accessorials or variances (between invoice / order) that exceed Tenant-specific or customer-specific thresholds.
- Data / Invoice Update - These exceptions can be resolved by updating fields within the invoice record in Navix.
- Order Updates - These exceptions will require updated fields in your TMS that will then transmit into the Navix application.
RECOMMENDATION: Please review custom fields flagged within the Metadata section of an order. These alongside line item or shipment details may be required, depending on your process, to address a flagged exception.- To find the metadata, expand order details, then look to the right.

- To find the metadata, expand order details, then look to the right.
- Disputes- Dispute exceptions require follow-up by an additional party (vendor for missing documents, customer for approvals, etc.) These can be monitored and managed within the Navix application for the entirety of the dispute (from initial email to resolution by either party.)
- Charges- These exceptions require mapping of a specific charge code. These can be addressed by updating and mapping the ‘Unknown Accessorial’ within Navix to one of the many charges outlined in the Navix application.
- Remove any exceptions no longer applicable (based on your recent actions.)
- Add any new exceptions due to new inconsistencies or new required validations.
STEP 7a: Auditing Vendor Details
| How to edit fields within the Vendor Details box
- The “Vendor Details” box on the left hand side is where changes are made to the following by clicking on the pencil icon in each category that needs updates:
- Vendor Name
- Freight Charge Terms
- Origin, Destination, and Bill To Information
- Dates (Ship Date, Delivery Date, and Invoice Date)
- Reference Numbers
-png.png?width=688&height=202&name=Untitled%20(6)-png.png)
- After making the necessary updates to the invoice, click the “Re-Audit” button to confirm the updates satisfied the exception alert and identify which exceptions remain.
- Any exceptions that are satisfied will drop off the exceptions list.
-png.png?width=688&height=211&name=Untitled%20(7)-png.png)
- Any exceptions that are satisfied will drop off the exceptions list.
STEP 7b: Auditing Line Item Details
- Review any line items that need adjustments to any of the information contained within.
- If a new line item needs to be added, click on the “+ Add New” button on the right side of the Line Item(s) box.
-png.png?width=688&height=97&name=Untitled%20(8)-png.png)
- To edit any existing line item detail, click on the pencil icon on the line that needs updating and edit the appropriate information.
-png.png?width=688&height=92&name=Untitled%20(9)-png.png)
- Click “Save” to save all updates
-png.png?width=688&height=454&name=Untitled%20(10)-png.png)
STEP 7c: Auditing Vendor Charges & View Documents
- To open the associated invoice and backup documentation click the “View Documents” button on the right side.
-png.png?width=688&height=116&name=Untitled%20(11)-png.png)
- Review the currency associated with this order and invoice.
- If the currency matches, continue to step 3.
- If the currency does not match, adjust it to the appropriate currency by clicking on the pencil icon in the upper left corner of the “Charges” box.
-png.png?width=688&height=101&name=Untitled%20(12)-png.png)
- A popup window will appear allowing you to select the appropriate currency.
-png.png?width=513&height=163&name=Untitled%20(20)-png.png)
- Click “Save” to save all updates.
- Review “Vendor” charges and compare to the charges on the vendor invoice.
-png.png?width=688&height=411&name=Untitled%20(13)-png.png)
- If all of the charges match, nothing needs to be adjusted and the invoice can be approved by clicking the “Approve” button at the bottom of the page.
-png.png?width=688&height=272&name=Untitled%20(14)-png.png)
- If there are discrepancies, perform the necessary audit and add/remove any additional charges by clicking the pencil icon next to “Accessorials” on the left hand side of the Vendor Charges pane.
-png.png?width=688&height=429&name=Untitled%20(15)-png.png)
- A popup screen will appear allowing you to add and remove any accessorials and corresponding amounts.
-png.png?width=688&height=655&name=Untitled%20(16)-png.png)
- Once you have added/removed the necessary accessorials, click the “Apply” button at the bottom right corner of the popup window.
- Once all charges match, click approve.
-png.png?width=688&height=272&name=Untitled%20(17)-png.png)
- Mapping Unknown Accessorials
- In some cases you will find that there is an “Unknown Accessorial” listed under the vendor charges. These accessorials will be items that need to be satisfied/mapped before being able to approve the invoice record.
- To map an unknown accessorial, identify the accessorials that need to be mapped and click on the pencil icon next to the accessorial.
-png.png?width=688&height=399&name=Untitled%20(18)-png.png)
- A popup window will appear with a list of accessorials that can be clicked to successfully map the unknown accessorial. In this example ( “Truck Ordered Not Used (TON)”) was not able to match to an existing accessorial. By clicking on the pencil icon you will be presented with the opportunity to map this to “Truck Ordered Not Used (TONU)” and approve the invoice.
-png.png?width=688&height=683&name=Untitled%20(19)-png.png)
- In this example there was a preexisting code to match to in the list so you would want to select the appropriate code and then click the slider button in the bottom left-hand corner to use the same mapping for future codes.
- If there is NOT a code to match to in the list, please send the information to Navix via the enhancement/support requests link (see Enhancement/Support Requests page) so we can add it to the list for future mappings.
- If all of the charges match, nothing needs to be adjusted and the invoice can be approved by clicking the “Approve” button at the bottom of the page.
- If you get the following message when hovering over the approve button, you still have accessorials to map.

STEP 8: Document Redaction
| This step will walk you through how to redact any information on a document. You can identify whether a document is the redacted version or the original copy by the "Is Redacted" column on the "Documents" tab.
From the “Documents” tab
- Identify the document that the user would like to redact and click on the pencil icon under “Manage” on the right-hand side of the page.

- A pop-pup window will appear with an image of the document. In the upper left-hand corner click on the redaction icon and select either “Text Redaction” or “Area Redaction” from the dropdown list.
- Text Redaction will allow you to redact specific text listed on the document.
- Area Redaction will allow the user to select an area and redact the whole area.
NOTE: Either option above works, however, we have found that Area Redaction works best in most cases.
- Select the area you wish to redact and click on the "Apply Redactions" button in the upper left-hand corner.

- Once complete, the area selected will be redacted from the document as shown below.
- To save the redacted document, click on the “Save Redacted” button in the upper right-hand corner.

- This will save a second copy of the document image (redacted copy) and can be identified by looking in the “Is Redacted” column on the “Documents” tab.

STEP 9: Base Level Checks
| At minimum, we recommend completing the following checks
- Documents
- Did the vendor(s) provide all necessary documents?
- Reference Information
- Are all necessary reference numbers found on the provided documentation (and does it match the order?)
- Do the addresses (for each corresponding Pick-up and/or Dropoff match?)
- Are the dates correct? Are the noted date / times present on the documentation, and do the correspond with the order information?
- Does the provided document contain the necessary “proof” for delivery confirmation (ex: signature, etc.?)
- Charges
- Are there any ‘Unknown’ Accessorials appearing on the Invoice?
- Do all charges found on the invoice match the order?
- If not, have the vendor(s) provide the necessary documentation to validate the charges?
STEP 10: Approving the Invoice
| Finally - How to Approve an Invoice
Once all (necessary) exceptions have been addressed you can approve the invoice by selecting the ‘Approve’ button in the bottom right corner.
NOTE: Not all exceptions will block approval. As such, please be mindful to confirm all necessary checks have been completed prior to Approving the invoice.

STEP 11: The Next Invoice
| How to easily navigate to the next invoice record
After actioning the last invoice - you can proceed (quickly) to the next invoice within the filtered workflow by selecting the ‘Next Record’ button at the bottom of the screen.

RECOMMENDATION: We recommend, for those operating with two monitors, keeping the Navix screen open on one with the documents pop-up included in the other. You will see the documents refresh following your progression to the next record.
STEP 12: Mass Actions
| How to Mass Approve, Re-Audit and Terminate a subset of invoices
To execute mass Re-Audit or Terminate actions, go to the “Audit” tab within “Invoices” under the “Audit” section.
- Select individual invoices to mass Re-Audit or Terminate by checking the box at the left of each line item, or select ALL invoices by checking the box in the header line.
- Selecting individual invoices one by one:

- Selecting all invoices in the grid:

- Selecting individual invoices one by one:
- Once the correct invoices are selected, click on the appropriate button to the right of the Search bar.
- The Mass Approve button is GREEN with a check mark icon.

- The Mass Re-Audit button is BLUE with a circulating icon.

- The Mass Terminate button is RED with a cancel icon.

- The Mass Approve button is GREEN with a check mark icon.